


Sunday, November 30, 2008
A Quick Baby Shower Invitation
Have you ever needed to make an invitation quickly? That was my dilemma and they needed to be fairly simple since I was making 20. I could have resorted to an e-mail invitation, but there is just something nicer about a traditional paper invitation. Browsing through the racks of scrapbook paper at the store, I came upon an idea of using a clear overlay of baby words from Creative Imaginations. I used a green paper from Die Cuts With a View for the background. For all the inside details of where and when, I printed those out and glued it inside. Done!


Saturday, November 22, 2008
Upcycling contest

I entered the Upcycling contest sponsored by Singer/Craft Magazine and was chosen as a runner-up! I created baby shower decorations using a pair of old jeans, stash ribbon and paper napkins. Check it on on their website.
Instructions:
Invitation -- use a blank greeting card, stitch ribbon, jean material, and paper napkin to front of card using zig-zag stich.
Centerpiece -- cut out two squares from old jeans, stitch sides together to create a bag, insert ivy and flowers, tie with ribbon, and cut out paper napkin elephant graphic and glue on front of bag.
Favor bags -- cut out small squares from old jeans and stitch sides together to create small bags, fill with candy, tie with ribbon, cut out elephant graphic from napkin and glue on front of bag.
Banner -- cut out denim squares and paper napkins with pinking shears. Stitch paper napkin squares to denim using zig-zag stitch. Cut small slits in corner of denim squares and thread ribbon through, tying knots at each slit.
Iris Folding

This is a recent card I made using the technique of iris folding. The paper and instructions used come in a kit by Anna Griffin. I added the ribbon bow and metal circle tag. I also used a Fiskar corner punch on the green background paper.
Iris folding refers to a technique where folded strips of colored or patterned paper are layered in a spiral pattern behind an aperture. It is called Iris Folding because it resembles the iris of a camera. This particular pattern included using ribbon as well as paper in the layered look.
I foun
d an excellent tutorial on iris folding here. This really helped me in understanding the technique.You can find free patterns here.
Monday, November 17, 2008
Scrapbook Flip Calendar
 I bought several of these flip calendar kits from K & Company. I made one for me and 3 other for gifts.
The kits includes the easel-back calendar, die-cut pocket pages, lined and numbered tab cards, die-cuts, stickers, Grand Adhesions, Clearly Yours, rub-on transfers, lace, buttons, ribbons, bow, colored floss and string. You add your own photos for each month. It also comes with 5 years worth of stickers to change the year at the bottom of the calendar.

Since this involved so much time in creating, I wanted to use it year after year. So, I attached each photo with photo-safe repositionable tape, so that I could change the photos out.
These are close-ups of two of the months created with photos of my nephew.

The tabs for each month pull out and you can write dates to remember on the cards and then slide them back in the pocket.
Saturday, November 1, 2008
Wedding Invitation
 One of my first card making ventures was to make wedding invitations for my sister in 1997.
Materials/Instructions:
5x7 Blank Strathmore Creative Cards
Large round paper doilies
Hunter Green ribbon
Hunter Green ink
1. Cut each paper doily in half.
2. Spray back of cut doily with adhesive.
3. Attach to front of card.
4. Ink the front edge of the card dark green.
5. Hot glue a small green ribbon bow to the front.
Wednesday, October 1, 2008
Window Treatments
Choosing window treatments can be daunting. This is one area that I do pay a little extra to get good quality fabric. Fabrics soften a space, and the right look will enhance your room's decor. It is usually best to use decorator fabrics as opposed to fashion fabrics. Decorator fabrics have different features which lend themselves better to drapery. Decorator fabrics are more durable, drape better and most have had a finish added to increase stain, crease, mildew, and fade resiliency.
But it is easier than you think to get a custom look at a bargain price. I wait for the 50% off coupons for JoAnn Fabrics and then go shopping. These are photos of different window treatments I have sewn for our home.
 Living Room. The panel curtains came with the house when we bought it and were lined. They were a little plain but good quality. Using Simplicity pattern #8803 I made the swags and jabots in coordinating fabrics to match the panels. They are attached (I stapled them) on a mounting board and attached the board to the wall over the current curtain rod system. These were definitely the most difficult window treatments I have made and took several days to finish. I kind of promised myself never to do these again :).
 The Dining Room is visible from the Living Room, so I made a matching swag topper here too. The plain panels were not wide enough for the window, so I added 2 coordinating print panels.
 Using Simplicity pattern #7204 I made these for the Office. The big saving here was the material I used were the curtain panels that came with the house for this room. I just repurposed them! I added two plain panels as accents.
 I used Simplicity pattern #8894 for these. When I chose the wallpaper and border for this room, matching fabric was also available. I purchased only 1 yard because it was REALLY expensive. It was just enough to make the fabric triangles. Each triangle has a tassel attached at the bottom. The triangles were attached to the curtain rod with metal curtain rings that have clips.
 These are the curtains I made to match our bedroom set. Pre-made floral curtain panels were available to match the comforter. I thought that much of the pattern was overwhelming. So I cut the bottom off the purchased panels and sewed brown suede fabric onto them.

I found a really good deal on these curtains, but they were too short. I liked the large grommets at the top, so I found coordinating fabric and sewed it to the bottom of the panels. My own custom look!
But it is easier than you think to get a custom look at a bargain price. I wait for the 50% off coupons for JoAnn Fabrics and then go shopping. These are photos of different window treatments I have sewn for our home.
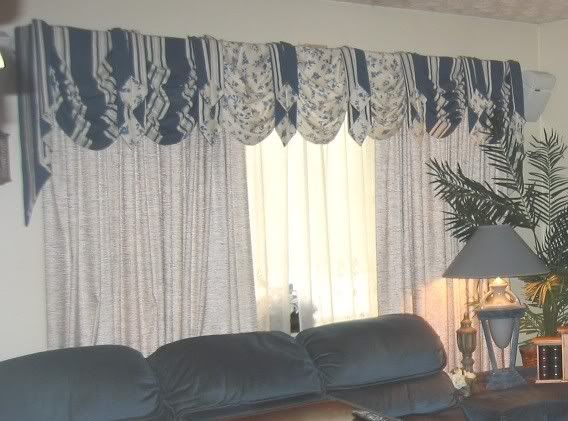 Living Room. The panel curtains came with the house when we bought it and were lined. They were a little plain but good quality. Using Simplicity pattern #8803 I made the swags and jabots in coordinating fabrics to match the panels. They are attached (I stapled them) on a mounting board and attached the board to the wall over the current curtain rod system. These were definitely the most difficult window treatments I have made and took several days to finish. I kind of promised myself never to do these again :).
 The Dining Room is visible from the Living Room, so I made a matching swag topper here too. The plain panels were not wide enough for the window, so I added 2 coordinating print panels.
 Using Simplicity pattern #7204 I made these for the Office. The big saving here was the material I used were the curtain panels that came with the house for this room. I just repurposed them! I added two plain panels as accents.
 I used Simplicity pattern #8894 for these. When I chose the wallpaper and border for this room, matching fabric was also available. I purchased only 1 yard because it was REALLY expensive. It was just enough to make the fabric triangles. Each triangle has a tassel attached at the bottom. The triangles were attached to the curtain rod with metal curtain rings that have clips.
 These are the curtains I made to match our bedroom set. Pre-made floral curtain panels were available to match the comforter. I thought that much of the pattern was overwhelming. So I cut the bottom off the purchased panels and sewed brown suede fabric onto them.

I found a really good deal on these curtains, but they were too short. I liked the large grommets at the top, so I found coordinating fabric and sewed it to the bottom of the panels. My own custom look!
Tuesday, September 30, 2008
Bedroom Suite Furniture

We built this wall unit for our bedroom. My brother-in-law had built two of these previously and created the design himself. Working with him it took us a week to cut, stain, and build everything. After we had it placed in the bedroom, my husband added the overhead lighting system. My favorite find are the door handles. I spent several hours on the internet searching for just the right size curved handles. I just love them! The guys weren't so thrilled as I guess there were quite difficult to install. It was a big project and was hard work, but we were really pleased with the finished pieces.
Subscribe to:
Posts (Atom)