Thursday, November 5, 2009

How to Make a Baby Bouquet

For my niece's baby shower, I made this adorable baby bouquet. The "flowers" are baby bibs rolled to look like flower buds! It's a nice alternative to the diaper cake. When I first saw photos of these, I knew I wanted to make one. There are several online stores that sell a completed version; just search on google for baby bouquets. Making your own isn't too hard either. Here are the steps:


STEP 1: Choose your materials


1. a container
2. small baby items like socks, bibs, washclothes, or onesies
3. silk flowers
4. a rattle or teether for embellishment
5. rubber bands
6. tissue paper


STEP 2: build the base


I bought a bath set with a hooded towel and washcloth. I folded the towel and placed it in the bottom of the container.


STEP 3: roll your flower buds


You want to use some small item to roll your flowers. The bigger the item, the harder this is to do. I used 7 terry cloth bibs to make the flowers. Fold a bib in half.


STEP 4:


Fold in half again.


STEP 5:


Begin rolling the bib to make the flower bud. It doesn't have to be exactly perfect - real flowers aren't perfect either.


STEP 6:


Secure the bottom of the rolled bib with a rubber band.


This is what it should look like when done.


STEP 7: Placement of flowers


Place all of the flowers in your container.


STEP 8: Finishing touches


To finish your bouquet, add in silk flowers, the tissue paper, and I added 2 teethers as well.

The tag lists all the baby items in the bouquet. I printed the list out on cardstock and ran it through my cuttlebug using a scalloped circle die.

Saturday, October 31, 2009

Glitter Bird Card Kit from Martha Stewart

I found these card kits by Martha Stewart at Walmart. From the package photo I wasn't all that impressed with it. I thought the cards looked a little boring, but the kit was marked down to $2. I figured that the cards and envelopes alone were worth that price. So I bought 2 kits. Each kit included 4 cards, 4 envelopes, 5 small bottles of glitter, and bird cutouts. The finished product is much prettier than the package leads you to believe. In one evening, my friend and I created 4 cards each. We used the glitter provided, but used our own color design on the birds, even mixing some the glitter colors together for a different effect. We also added patterened paper behind the birds to jazz them up a bit. Other than having glitter go EVERYWHERE, this was a fun project. I think our finished cards are quite lovely.


Robyn's Cards


Erin's Cards

Wednesday, October 14, 2009

Paper Bag Puppets

In looking for "boy" craft projects for my nephew (which is not easy by the way), I found these puppet kits at Walmart, on clearance for $1.00 each! Got to love that. All the pieces came already cut and ready to assemble. My nephew is three. I thought for $1.00 I would try it and figured he would rip them to shreds. But he didn't. He needed help with gluing a few of the pieces, but overall did a pretty good job and he actually played with them instead of tearing them up! A great afternoon project.

I did find a couple of websites that give instructions on how to put together your own paper bag puppets. Give them a look.


Martha Stewart paper bag animals


Enchanted Learning paper bag puppets


ABC Teach puppets

Monday, October 5, 2009

Puzzle Maker

I just purchased this nifty little gadget. You can take any photo and turn it into a puzzle! You adhere a photo to a foam backing. Then punch out each piece. I was pleased with the ease of which this worked. I originally thought it would be cool to make puzzles for my 3-year old nephew. But he was more fascinated with the actual punch then the finished product! Another idea is to make party invitations into puzzles and mail them disassembled. The recepient would have to put the puzzle together to read the message. The puzzle punch is made by Ecstasy Crafts.

Monday, September 28, 2009

Rose petal votive candle holder


This is a cute little rose petal candle holder you can make out of felt rose petals. Here is what you do:

Materials needed:
Felt rose petals (or silk ones would be just as good)
Glass votive holders
Hot glue gun / glue sticks
General purpose craft glue

Instructions:
1. Start by gluing individual rose petals to the botton of the glass votive in a circular pattern.
2. Keep adding petals until you reach the desired width. This creates a base to work from.
3. Then add petals in a circular pattern on top of the base, working your way up the glass holder. Hot glue the petals to each other - not to the glass. Be careful not to glue the petals too close to the top. You don't want them to catch on fire when the candle is lit!
4. Once you have glued all the petals, carefully peel the entire rose petal holder off the bottom of the glass holder. Using a general purpose craft glue, place a generous amount in the bottom on the rose petal holder and place it back on the bottom of the glass holder. The reason for this is that once you light the candle, the hot glue will not hold the petals to the glass due to the heat of the flame.
5. Place your choice of any votive candle inside and enjoy.

Tuesday, September 15, 2009

Introduction to Digital Scrapbooking

Have you thought you would like to try Digital Scrapbooking, but think it’s too complicated or too expensive? Getting started is not as intimidating as you may think.

When you create a digital scrapbooking layout or image, you do it in much the same way that you would with traditional scrapbooking, in that you layer papers and elements on top of one another. Each paper, photo, or embellishment exists on its own layer in your document, and you can reposition them at your discretion.

It’s easy to get started and you don’t have to invest any money. You can download a free image and photo editing software at www.paint.net. It features an intuitive user interface with support for layers and special effects, along with a wide variety of useful photo editing tools. Don’t worry if your not very computer savvy, they have tutorials to guide you. Did I mention that the best part is it’s FREE?

There are many sites that also offer free digital kits and ready-made pages to download. Take a look at www.digifree.blogspot.com/ or www.digiscrapdepot.com/freebies.

You can choose to print your finished pages, post them to a website for family and friends to see, display in a digital frame or use them as screensavers. Digital scrapbooking is especially useful if you want to create the same album for several people as gifts. You create the first album, save it, and then print as many as you need.

Even if you don’t want to create an entire layout digitally, you can use the papers and elements separately and print them out to add to your traditional paper scrapbooking.

Here are a couple of my layouts using free quick page templates. Using quick pages takes very little time.


Follow these steps:
1) Choose your template to download
2) Open the template in an image software program such as the free program I mentioned or Adobe Photoshop.
3) Enlarge image to 12x12.
4) Insert photo of your choice and place/layer behind the template.
5) Save file under a new name.
6) Post, email, or print.

Another fun alternative are scrapbook services such as Smilebox. They have hundreds of professional designed page layouts for you to choose from. You can sign up for free and then simply drag & drop your photos or videos into a design. You also have the option of adding music, captions, and embellishments. Email your creation or post it to Facebook, MySpace, or blog for free!

Try these free scrapbooking alternatives and see if digital scrapbooking is for you.

Tuesday, September 1, 2009

Beans, Beans, Beans!

I haven't had much time for crafting lately. I've been neck high in canning beans! It's sort of a tradition at this time of year for our family. I'm the official bean snapper and my mom cans as much as possible. Canning food is becoming popular again as food prices have increased.

Canning is economical. The same equipment—including canning jars—can be used year after year. Only lids must be purchased new each canning season.


Canning lets you savor favorite foods all year, including out-of-season and homegrown, organic goodies.

It beats freezing: stored canned goods don’t spoil when the power goes off. Most frozen foods claim a one-year life expectancy. But with only slight decline in looks and flavor, canned items can last for two to three years or more.

If you want to give canning a try, check out the following websites:

http://foodsafety.psu.edu/canningguide.html

http://www.uga.edu/nchfp/

http://www.freshpreserving.com/ -- there are videos on this site too.

Thursday, August 13, 2009

Party Favors -- Hershey Kisses

Who doesn't love chocolate? Hershey's is the chocolate that everyone knows and loves, and so will your guests!

These little drops of yumminess have been putting a smile on people’s faces since the early 1900’s. Sprinkle these treats on tables to add sparkle to your occasion or arrange kisses in unique vases or bowls and use as centerpieces. However you choose to spread these little favors make sure you have enough……after all one kiss is NEVER enough!

An added special touch is to have your customized message printed on a Hershey's kiss. Follow these instructions to make your own personalized labels:

1. Download template from HERE.
2. Open template in Microsoft Word.
3. Insert your own personalized message and/or graphic into the label template.
4. Print labels using Avery label # 5408. I purchased mine from Office Max. There are 24 labels on each sheet.
5. Simply peel and stick to the bottom of Hershey Kisses.


The labels can also be used on Starlight mints, Mini Rolo's and individual wrapped Lifesavers.

Wednesday, August 5, 2009

Family Cookbook

Every year we take a family vacation to the beach. We have a large group of anywhere from 20 to 25 people. One of best parts of the vacation is the food! We save all our favorite recipes to cook on vacation and collect them into one journal. The journal keeps growing each year and now is stuffed full of clippings and notes. I wanted to find a way to compile them into something that is functional but still looks really nice. I thought about uploading the recipes to one of those websites where you can have your work bound into a book, but wanted to have the ability to keep adding to it. I found a really cool site that was perfect for what I wanted. It's called Taste Book. You can load in all your recipes, complete with photos, and even choose a cover for your cookbook. They print it and it comes in a binder along with dividers. I just got the finished product in the mail and I just love it! I'm impressed with the quality and look of our customized family cookbook. The site saves all your recipes, so you can share them with family members and they can order their own cookbook.

Thursday, July 23, 2009

2 More Submissions Accepted!

I just found out today that 2 of my submissions will be featured in upcoming magazines. Check them out by clicking on the their blinkies (in left-hand column)!

August/September 2009 Ready, Set, Create magazine -- an owl greeting card

August 2009 Scrapbook News and Review magazine -- Playing Ball digital layout

Wednesday, July 15, 2009

Published Again!

These all seemed to come in at the same time. Very exciting! You just never know what will be accepted.


Butterfly Punch Card

Published in the March/April 2009 issue of
Scrap n' Art

Supplies:
5x7 blank greeting card
Sweet Life Papercrafting and Cardmaking
Fiskars 4-in-1 Embossing Corner Punch - Glory
Ecstasy Butterfly Clip Punch

Instructions:
1. Cut rectangle from pattern pattern a little smaller than 5x7.
2. Punch each corner using Fiskar corner punch.
3. Affix double-sided tape to back of rectangle and place on front of card.
4. Select die-cuts from Sweet Life Papercrafting and Cardmaking Pack. Affix to front of card with double-sided tape.

5. Punch butterflies out of orange paper using the Ecstasy Butterfly Clip Punch.
6. Clip around circle die-cut. For added security, use small glue dots to keep butterflies in place.

Wednesday, July 1, 2009

Published!

Ready, Set, Create online magazine accepted 2 of my submissions for publication! They were in the March/April 2009 magazine. Here they are:


This card was made from a recycled mini gift bag. I cut the front off the bag and attached it to a 3x5 blank greeting card. Punched 2 holes on each side of the card. Using the handle from the bag, I threaded the metal tags onto the cord and then through each side of the card. The black & white flower is the gift tag from the bag.


Papers and elements: Denim & Lace digital kit by Rachael Hudnall.
Title was handstitched and then scanned in.

Monday, June 15, 2009

Recycled Candle Holders

It's hard to stop the recycling kick once you get started. I keep looking at things in a whole new way. I made these candle holders out of small cardboard tubes.
1. Cut each tube to the desired height.
2. Spray with metallic paint and sealer.
3. Insert floral foam inside the tube, making sure the bottom is level.
4. Insert candle into foam.
5. Arrange silk leaves and butterfly as shown.
Obviously if you choose to actually light the candle, you would need to be careful as the candle burned lower, so as not to catch the leaves and cardboard on fire.

Saturday, May 30, 2009

Recycled Flower Vases


For a friends wedding, we needed 20 very tall flower vases for the reception tables. The tall glass ones would have been great, but also very expensive. We came up with this economical version instead. I started with large cardboard tubes; the kind that holds plotter paper for drafting printers. I sprayed each with silver metallic paint and then a sealer. The sealer really is necessary. I learned the hard way when the paint began to rub off on my hands! Inside each tube, we placed a weight (it isn't seen, so it can be anything) and then arranged a few flowers and ivy.

Friday, May 15, 2009

Envelope Seals

I used this stamp to make envelope seals for the birth announcements. It was a little labor intensive, but so cute! Using a 8 1/2 x 11 label sheet, stamp the entire page. Color each stamp. Punch out with a circle punch. You now have customized seals for your envelopes.

Thursday, April 30, 2009

Birth Announcements

Anything worthwhile deserves to be announced. Who doesn't want to share the news of their new baby with everyone they know? The birth of a child is one the most memorable and enjoyable events of a persons' life. Personalized photo birth announcements are my personal favorite and are a thoughtful way to convey this special occasion to family and friends. The photo birth announcement is can be as simple or as complicated as you want it to be. Besides, it has exactly what you and your friends are really after in an announcement – a picture of the BABY!

You can easily make a photo birth announcement yourself. It also can make a wonderful gift to the new mom.


I chose a photo-holder tri-fold card. Unfolding the card I punched a small hole in the first fold and inserted a matching yarn to wrap around the front of the card. This way the card will still open! I punched 1” squares out of white cardstock, stamped a little foot (stamp is from Stampin' Up) onto it, wrote “I’m Here” across it, and matted it with matching cardstock. I glued the completed square to the front of the card.

The cards can all be pre-assembled, just waiting to insert the photo after the big day. The birth details can easily be printed and inserted inside, leaving room for a personalized note if the mom so wishes.

Wednesday, April 15, 2009

Baby Shower Favors

Baby shower party favors are one of those nice touches at the baby shower. Favors do not have to be complicated and can be virtually anything. They can be edible, useful, or sentimental, just be creative as much as you can. The only limitation is your imagination!

I made this bookmark for my sister’s baby shower. The baby stamp is from Stampin’ Up. I printed off the quote and then stamped the image and used colored pencils to decorate. I inserted the bookmarks into a clear plastic sleeve. Guests can add their own bookmarks later and use over and over. I purchased the sleeves here. The tassels are sold separately.


The quote says: "I’m really glad that you could come to my mommy and daddy’s shower. Sit down, relax, enjoy yourself and chat with one another. Sorry I can’t be with you, but you see I’m very busy because I’m growing more each hour. I’ll be arriving shortly. I’m happy as can be, so after I’ve been home a while – please come visit me!"

Other favors I have made include:
Tea Bags – make your own paper wrappers with the words “A Baby is Brewing!” Add the date and name of the mother.

Popcorn – make your own paper wrappers with the saying “Baby (Last Name) is Popping in!”

Candles – make labels for the top of a tin that holds a candle. You can often find these for $1.00 each. Or wrap ribbon/yarn around the outside of the tin. Add a tag with the date and name of the mother.

Seeds – place wildflower seeds in a tiny envelope. Make a label that says, “Please plant these seeds and watch them bloom, just like baby (Last Name) who will be here soon!”

Bookmarks – avid readers always appreciate bookmarks. Print your own with the saying, “This bookmark is given to remember (Mom’s name) new chapter in life. Thank you for sharing in this special day!”

Sunday, March 29, 2009

Diaper Cake

A diaper cake is a wonderfully creative gift for an expectant mother. It is a collection of diapers (either disposable or cloth) rolled and stacked together to resemble a traditional tiered cake. There can be 1, 2, 3 or more tiers. The tiers of diaper cakes can also be decorated with baby care items such as bibs, pacifiers, baby socks, bottles, toys, and more.

After seeing all the photos online of diaper cakes, I just had to try and make one.

Here are the directions on how I did it:


Supplies:
50 to 60 diapers
Ribbon at least 2-inches wide
50 to 60 clear, small rubber bands
A sturdy core piece – a heavy cardboard tube, a baby bottle, or lotion bottle
Decorations – silk flowers, baby items such as pacifiers, bottles, bibs, miniature stuffed animals, etc.

A cardboard or plastic cake platter for the base. The base needs to be sturdy. It can be made of cardboard or metal or even glass. It must be strong enough to carry the weight of the cake. You can buy pre-made sizes or cut cardboard to fit. If you are cutting it yourself make sure that you do not use the any box folds in the circle you cut. The fold will not support the weight. You can cut exact size of the finished layers or leave a little extra around it for decorating purposes.

Assembly:
The first thing you need to do is have a way to secure the diapers once they are rolled up. Some people use ribbon, clear rubber bands, or tape; be careful with this so the diapers are still useable. Roll the diapers and put ribbon or clear rubber bands to hold them in place. This will take the most time. The rest of the assembly will go quickly once they are all rolled up.

Roll the diapers in a manner to have any outside edge decoration facing inward. Try to place the rubber bands in the middle of each diaper. The idea is for the rubber bands not to show in the final piece. It will be easier to cover it with ribbon if they are approximately all in the same place.

Putting the cake together:
The bottom of a three tier cake will need 2 layers of diapers around a center focal point. I used a sturdy cardboard tube for the center piece. Tie a ribbon around each layer to make the next layer easier to construct. When you have the center piece and 2 surrounding layers together, tie it with ribbon to keep in one place.

Repeat this with the second and top layers. The top layer will only be 1 circle of diapers. You may need to put an additional center piece in for the top layer if your cardboard tube or bottle is not tall enough.

Decorating:Use ribbon and final materials to give the cake a finishing touch. I prefer the finished piece to look more like a real cake. So I chose silk flowers, ribbon, and tulle as my only decorations. I just tucked the stems of the flowers in between a few of the rubber bands. No glue! You want the mother-to-be to be able to disassemble your gift and actually use it. I used a purchased stuffed animal/blanket combo for the top of the cake.

If you are a visual person like me, watching a video really helps with the construction. I liked this one -- video.

Sunday, March 15, 2009

Dried Floral Arrangements

There are several ways to preserve fresh flowers for years without a great deal of work or expense. The easiest and least expensive method is air-drying. This is a wonderful way to preserve those special flowers received as a gift or flowers from your own garden.

Fasten small bunches of fresh flowers together with a rubber band near the cut end of the flowers. Don't use string or wire, as the stems will shrink as they dry, and may fall out of their tie on to the floor. Hang the bundled flowers from a hook or hanger upside down in a clean, dry place out of direct sunlight, such as a closet.

Let the flowers air dry for two to four weeks. When the flowers are ready, they will be dry and crisp to the touch.

Once dry, spray with clear hair spray to preserve the color and stop the petals from dropping.

So now that the flowers are dried, what do you do with them? You can
make a wreath or a dried flower arrangement, perhaps hang your dried roses in a window, make a photo frame box, glue dried petals or buds to letters or menus, or use dried petals in a potpourri.

I dried my wedding anniversary roses and made this arrangement. Everytime I see it, I'm reminded of the special memories of that day.

Sunday, March 1, 2009

How to Create Your Own Silk Flower Arrangements

Looking for a floral arrangement to spruce up your room, but don't want to spend a lot of money? Make it yourself! You can often find silk flowers on clearance or at discount stores. Sometimes you have to be patient and wait for the sale or look for coupons. I found several really nice silk tree branches on clearance. I bought them with no particular plan in mind, but they were really nice quality and the price was right. I ended up making two arrangements.


The first one I created in a floor vase (on clearance of course). It had a few dings, but nothing that couldn't be hidden with a little touch-up paint. I put floral foam inside the vase and using floral pins covered it with moss. Then I placed each branch into the foam.


The second one is smaller and for a table top or shelf. I started with a large styrofoam ball. Then I cut the leaves and flowers off the branches, placing each individual stem into the ball until entirely covered. To display, I placed the ball on top of an inexpensive metal container.


Wednesday, February 18, 2009

Make Your Own Wallpaper Border

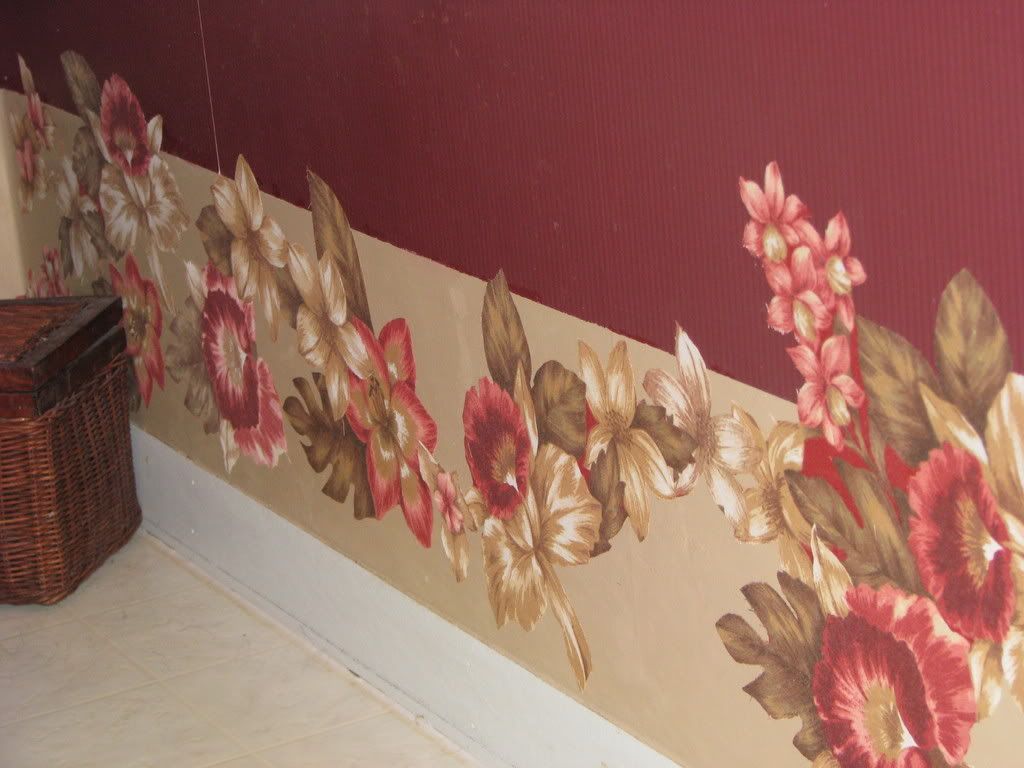
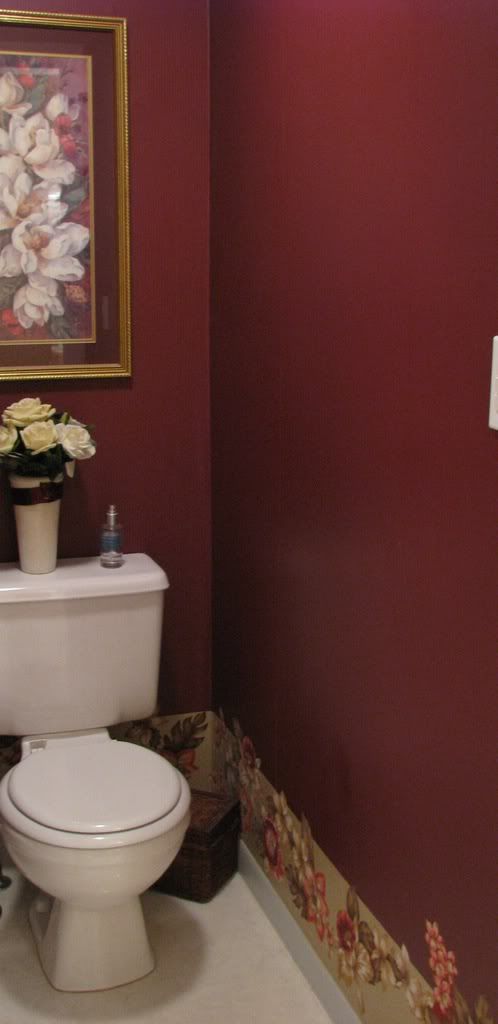
What to do with an existing wallpaper border that you don't like? Paint it! Painting borders needs to be well planned. Make sure to put tape around the edges of the border, and make sure it's painter's tape. Many have fallen victim to pulled up paint chips by using scotch tape as a substitute. Does this really work? Yep, I tried it and it worked wonderfully. Our master bathroom has a separate, very small toilet room. The actual wallpaper was o.k. and matched the decor I wanted. BUT, the border was not to my liking. I wanted to save the wallpaper, but ditch the border. There was no way to peel off the border without ruining the wallpaper. So, I carefully taped off the edges of the border and painted right over it. It worked very well. Then, I took extra fabric left from making the bedroom curtains, and cut out the floral designs. I admit this part was a little time consuming (gives you something to do while watching TV). Using liquid starch, I covered each fabric cutout and "pasted" it onto the dried painted border. Now I have a coordinated master bedroom and bathroom, without spending a lot of money. The best part is if I get tired of my new floral border, I can peel it right off without harming the paper underneath and use something else. Below are photos of the matching comforter and curtains -- close up of the border -- and a full length room view.


Thursday, January 29, 2009

Leaves x 6 Wall Art


Grouping like things together makes a bigger statement then just hanging one small frame by itself. I used 4x4 stretched canvas frames to make this collection showcasing different kinds of leaves. This is a fairly easy project. The hardest part is hanging them evenly!
Instructions:
1. Paint six 4x4 stretched art canvases with brown textured paint and set aside to dry.
2. Tear handmade white paper (or something that is heavily textured) to fit each frame.
3. Using 6 different types of dried or silk leaves, affix one to each of the white papers.
4. Finish off with various types of buttons, yarn, raffia, and beads.
5. Glue finished collage to center of canvas frame.

Tuesday, January 27, 2009

More Uses for Scrapbook Supplies

Do you have leftover scrapbook supplies that you'll probably never use? I know I do! Don't throw the items away or let them take up all the room in your supplies folder, use them to decorate other parts of the house.

Here's an example of what I did with a few leftover supplies:

BEFORE PHOTO

I found this wall plaque at a discount store.

The middle is a cermaic plaque that slides out of the frame and came with a printed leaf on it.

I took the cermaic plaque out and glued layers of torn handmade paper to it and, to finish it off, placed a skelton leaf in the middle.


AFTER PHOTO


What can you do with your leftover scrapbook supplies? Here are 12 ideas to get you started:
1. Make handmade cards.
2. Add dimensional texture to your scrapbook borders by layering.
3. Make matchbooks out of your scraps.
4. Use the scraps to frame smaller photos.
5. Use as photo corners.
6. Make gift tags.
7. Make homemade envelopes.
8. Piece together a paper crazy quilt. Adhere your scrap down to your
album page to mke a crazy quilt background. Use your pens to make
fun or fancy 'stitches.'
9. Exchange supplies on a craft forum.
10. Make a mini album.
11. Make fridge magnets. View examples here.
12. Tear up or shred as a gift bag filler.