Showing posts with label Our Family Crafts. Show all posts

Tuesday, September 1, 2009

Beans, Beans, Beans!

I haven't had much time for crafting lately. I've been neck high in canning beans! It's sort of a tradition at this time of year for our family. I'm the official bean snapper and my mom cans as much as possible. Canning food is becoming popular again as food prices have increased.

Canning is economical. The same equipment—including canning jars—can be used year after year. Only lids must be purchased new each canning season.


Canning lets you savor favorite foods all year, including out-of-season and homegrown, organic goodies.

It beats freezing: stored canned goods don’t spoil when the power goes off. Most frozen foods claim a one-year life expectancy. But with only slight decline in looks and flavor, canned items can last for two to three years or more.

If you want to give canning a try, check out the following websites:

http://foodsafety.psu.edu/canningguide.html

http://www.uga.edu/nchfp/

http://www.freshpreserving.com/ -- there are videos on this site too.

Wednesday, October 1, 2008

Window Treatments

Choosing window treatments can be daunting. This is one area that I do pay a little extra to get good quality fabric. Fabrics soften a space, and the right look will enhance your room's decor. It is usually best to use decorator fabrics as opposed to fashion fabrics. Decorator fabrics have different features which lend themselves better to drapery. Decorator fabrics are more durable, drape better and most have had a finish added to increase stain, crease, mildew, and fade resiliency.

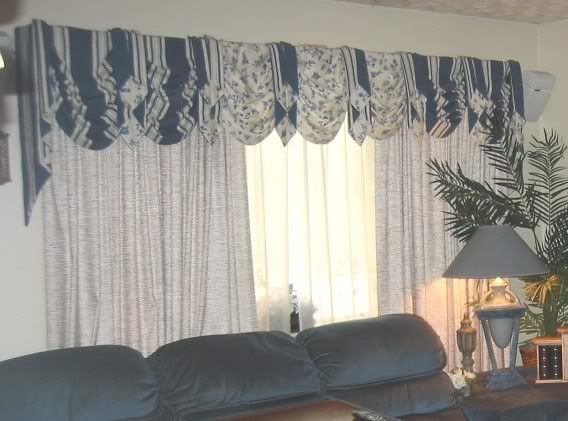
But it is easier than you think to get a custom look at a bargain price. I wait for the 50% off coupons for JoAnn Fabrics and then go shopping. These are photos of different window treatments I have sewn for our home.


Living Room. The panel curtains came with the house when we bought it and were lined. They were a little plain but good quality. Using Simplicity pattern #8803 I made the swags and jabots in coordinating fabrics to match the panels. They are attached (I stapled them) on a mounting board and attached the board to the wall over the current curtain rod system. These were definitely the most difficult window treatments I have made and took several days to finish. I kind of promised myself never to do these again :).


The Dining Room is visible from the Living Room, so I made a matching swag topper here too. The plain panels were not wide enough for the window, so I added 2 coordinating print panels.


Using Simplicity pattern #7204 I made these for the Office. The big saving here was the material I used were the curtain panels that came with the house for this room. I just repurposed them! I added two plain panels as accents.


I used Simplicity pattern #8894 for these. When I chose the wallpaper and border for this room, matching fabric was also available. I purchased only 1 yard because it was REALLY expensive. It was just enough to make the fabric triangles. Each triangle has a tassel attached at the bottom. The triangles were attached to the curtain rod with metal curtain rings that have clips.


These are the curtains I made to match our bedroom set. Pre-made floral curtain panels were available to match the comforter. I thought that much of the pattern was overwhelming. So I cut the bottom off the purchased panels and sewed brown suede fabric onto them.


I found a really good deal on these curtains, but they were too short. I liked the large grommets at the top, so I found coordinating fabric and sewed it to the bottom of the panels. My own custom look!


Tuesday, September 30, 2008

Bedroom Suite Furniture


We built this wall unit for our bedroom. My brother-in-law had built two of these previously and created the design himself. Working with him it took us a week to cut, stain, and build everything. After we had it placed in the bedroom, my husband added the overhead lighting system. My favorite find are the door handles. I spent several hours on the internet searching for just the right size curved handles. I just love them! The guys weren't so thrilled as I guess there were quite difficult to install. It was a big project and was hard work, but we were really pleased with the finished pieces.

Thursday, September 25, 2008

Sculpture String-Art Sailboat


My Dad encouraged my crafting ability. He always was bringing home different kits for me to put together. This one is a 3-D string-art sailboat that I did as a teenager. I've not seen one like it anywhere else.

Friday, September 12, 2008

Great-Aunt Esther's Embroidery

Much of the embroidery we see today is done by machine. But beautiful stitching is possible by hand. Hand embroidery is a traditional art form passed from generation to generation in many cultures. This is a photo of a handkerchief that my Great-Aunt Esther embroidered.

Embroidery designs may be stamped or drawn on the material, or they can be done freehand. Embroidery uses embroidery floss and an embroidery needle, which has a slightly larger eye but is still sharp.

There are five basic stitches. There are more, but if you learn these five you can work 95 percent of the kits available. The stitches are:

(1) Outline stitch. This is a running stitch that, as the name implies, outlines a design.

(2) Satin stitch fills in open areas with closely worked stitches that give the appearance of satin.

(3) Lazy daisy makes small flower petals

(4) The basic cross (X) stitch also fills in open areas, or forms designs

(5) French knot is used to suggest small dots, such as eyes, pebbles, flower centers, and so on.

A very handy dictionary of different stitches
Free patterns for hand embroidery

Thursday, September 11, 2008

Great-Great-Grandpa's Desk


My Great-Great-Grandfather Bone made this drop-lid writing desk. By the time it came to me it was covered with an awful black shiny varnish. Apparently black varnish was my Great-Grandma Ringer's solution to everything. I can remember that most of her furniture was covered with it. I striped the old varnish off and stained it a beautiful walnut color and then rubbed linseed oil into the wood.

Great-Grandma Fannie's Quilts


Grannie made each great-granchild a quilt. She hand-quilted each one -- no machine quilting for her! The photo shows 2 of her quilts. One of Grannie's favorite pattern was the flower garden. She would use up all her fabric scraps from old dresses and other fabrics that she had on hand.

You can find the flower garden pattern here.

Ever wonder what to do with all of those plastic grocery bags? Instructions to quilt your very own tote using the plastic grocery bags are here. Very cool . . .


I just love these quilted bag patterns, particulary this blue bag. I bought this pattern! I hope to make one soon.


Wednesday, September 10, 2008

Grandma Vera's Crocheting


Here are a few things Grandma Vera crocheted. An Afghan she made as a wedding present for me and one of her handkerchiefs. Grandma was a whiz at all things crochet. She could whip up sweaters, scarfs, hats, afghans, dollies, whatever she wanted, all while watching TV.


She made attempts at showing me how. I know the basics but did not seem to have the patience required.


Of course now that I've seen some patterns for jewelry made by crocheting, I'm more interested in revisiting this craft. These are some of the free patterns that caught my eye:


Crocheting w/ beads


This one isn't a free pattern, but I really like it -- and I think it's well worth the $7.00 for this pattern and 3 other styles that come with it.

Tuesday, September 9, 2008

The Art of Shuttle Tatting

Tatting is a vintage craft used to make a type of lace. A tatting shuttle facilitates tatting by holding a length of wound thread and guiding it through loops to make knots.
To make the lace, the tatter wraps the thread around one hand and manipulates the shuttle with the other hand. No tools other than the thread, the hands, and the shuttle are used, though a crochet hook may be necessary if the shuttle does not have a point or hook.

My Great Grandma Fannie used a shuttle to tat. She made lace for edges of handkerchiefs, dollies, and pillowcases. One of her handkerchiefs is pictured to the right.

While the finished product looks quite complicated to complete, many websites promise it isn't so hard to learn. You can find several sites to learn tatting, complete with step-by-step photos.

A beginner's guide to tatting.
Instructional
video on YouTube that is very good.

By far the coolest thing to inspire me to learn to tat is JEWELRY. I'm always a sucker for unique jewelry. I found several free patterns online.

tatted necklace and braclet set


tatted earrings


tatted earrings


First Post! -- Milk Filter Bed Dolls


Well, here goes my first post . . .

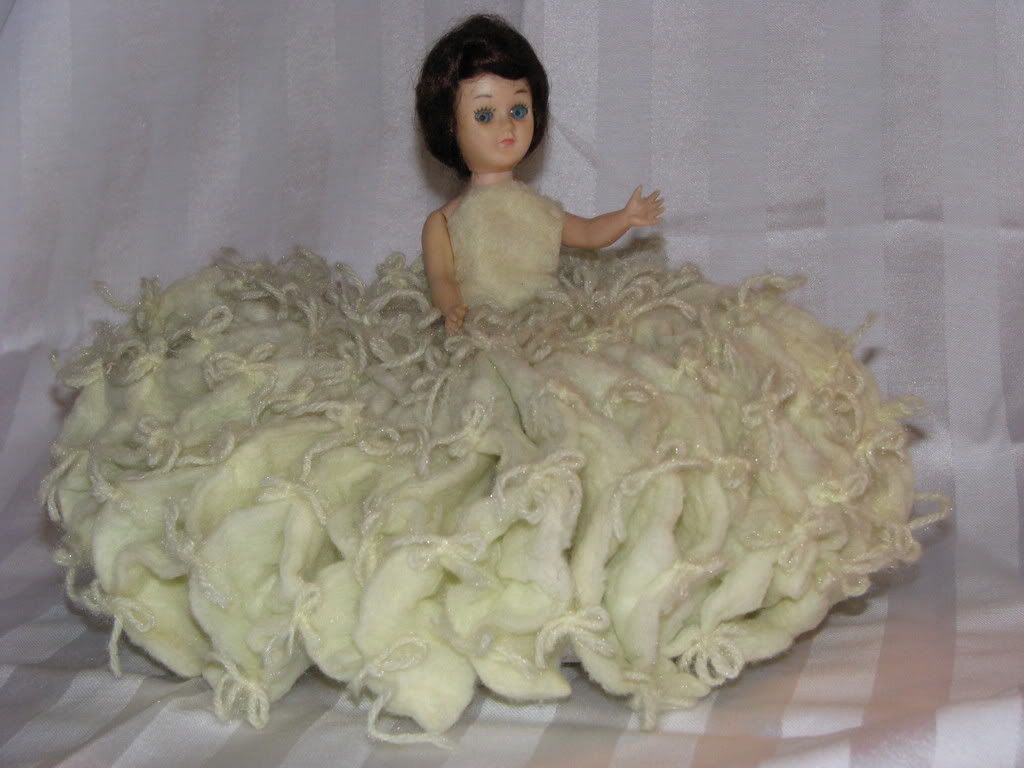
This is the doll that started the idea of this blog. My Mom has kept this doll for years because, well, it was made by Great-Grandma Lucy. You can't throw it away, geeesh. The idea was born to keep a record of family hand-crafted items.


This doll is called a milk-filter bed doll because milk filters were used to create the dress. Even after 50+ years, it still looks in pretty good shape.

These were popular in the 1950's and kits were sold by various stores. A 6" to 8" doll was used, and you made a dress out of milk filter discs about 6" in diameter. You quartered them, then tied them in rows with yarn to form a dress and skirt.

If your interested in trying it for yourself, click here to download the instructions.

You will need about 60 discs for each doll. You can buy the milk filters from Hoegger Goat Supply. The item number is 11G. They come in a package of 100 for $5.45.